Add Dimensions SolidWorks
Click Dimension on the Sketch Relations toolbar.
The pointer shape changes to .
Click the top line of the rectangle.
Click the dimension text location above the top line.
The Modify dialog box is displayed.
Enter 100. Click or press Enter.
Click the right edge of the rectangle.
Click the dimension text location. Enter 65.
Click .
The top segment and the remaining vertices are
displayed in black. The status bar in the lowerright
corner of the window indicates that the
sketch is fully defined.
Changing the Dimension Values
The new dimensions for the box are 100mm x 60mm. Change the dimensions. Use the
Select tool.
Click Select on the Sketch toolbar.
Double-click 65.
The Modify dialog box appears.
Enter 60 in the Modify dialog box.
Click .
Extrude the Base Feature.
The first feature in any part is called the Base Feature. In this exercise, the base feature is
created by extruding the sketched rectangle.
Click Extruded Boss/Base on the Features toolbar.
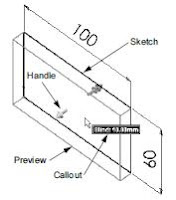
The Extrude Feature PropertyManager appears. The view of the
sketch changes to isometric
Preview graphics.
A preview of the feature is shown at the default depth.
Handles appear that can be used to drag the preview
to the desired depth. The handles are colored yellow for
the active direction and gray for inactive direction. A
callout shows the current depth value.
Click on the screen to set the preview into Shaded mode.
The cursor changes to . If you want to create the
feature now, click the right mouse button. Otherwise, you
can make additional changes to the settings. For
example, the depth of extrusion can be changed by
dragging the dynamic handle with the mouse or by
setting a value in the PropertyManager.
Extrude Feature settings.
Change the settings as shown.
• End Condition = Blind
• (Depth) = 50
Create the extrusion. Click OK .
The new feature, Base-Extrude, is displayed in the
FeatureManager design tree.
Tip
The OK button on the PropertyManager is just one way to complete the command.
A second method is the set of OK/Cancel buttons in the confirmation
corner of the graphics area.
SolidWorks 2001
Student Workbook
SolidWorks Corporation
300 Baker Avenue
Concord, Massachusetts 01742


